Der Schmale – David Lenaerts’s blog

Flash Platform Experiments

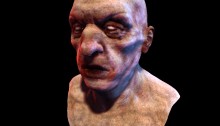
Another Take on Skin Rendering

Tags: , , , , ,

It’s been a while since I’ve made a blog post about something I’ve played around with just for the heck of it.  With Away3D 4.1 Alpha pushed out yesterday, I decided to spend the day revisiting an old friend: skin rendering. Remember the blog post of skin rendering when Away3D 4 was still codenamed Broomstick over a year and a half ago? (ugh, time flies!) A lot has changed in the engine, and many new features have been added. It made sense to therefore build a new but similar example showing some newer additions, and highlighting how things were put together. There’s two variations of the demo:

  • With a familiar face: Using the same Lee Perry-Smith model as before, for direct comparison (and because it’s free and I’m a stingy wretch)
  • With a unfamiliar face: Using a free (and insanely detailed) model from TurboSquid because I’m getting a bit sick of the old head (no offence intended to Mr. Perry-Smith) And again, it’s free and I’m a stingy wretch!

As usual, click+drag to move the camera.

There’s source right here. There’s a bunch of boiler plate in there, but the only thing of interest in this case should be the initMaterial method in Main.as. I’ll highlight the material setup here.

Multi-pass materials

The demo is using a multi-pass material for a few reasons. It allows the shadow mapping to more complex, and it prevents the non-casting lights from being masked by the shadow map, allowing for more dramatic lighting effects.

Soft Shadows

With a SoftShadowMapMethod assigned to the material, it’s possible to – as the name suggests – cast soft shadows on the skin. The class was updated in Away3D 4.1 along with some other shadow map methods, allowing more samples to be taken in the shadow map. This way, the results are much smoother which is especially important when tweaking the method’s range property. It sets the distance with which shadow map samples are taken, effectively creating softer shadows (a setting you can tweak in the demos). Of course, the more samples you take, the more demanding your shader will become.

Fresnel Specular Highlights

This is identical to the old demo. It uses FresnelSpecularMethod to achieve the fresnel effect, causing stronger highlights at glancing viewing angles. The fresnelPower can be tweaked to change the viewing angle fall-off: higher values increase the fresnel effect.

Subsurface Scattering Through Gradient Diffuse Lighting

By using GradientDiffuseMethod, you can acchieve a very crude approximation to subsurface scattering. It allows you to pass a gradient image to define the colour and strength of the diffuse reflection for each light/normal-angle. The left of the texture (x = 0) contains the reflection for surfaces pointing away from the light, the right is the reflection when completely facing the light. This allows darker lighting to be made a bit lighter. In this case, by introducing a little red in the mid-values (see “embeds/diffuseGradient.jpg”), we can simulate the addition of scattered light into the final shaded colour. While it doesn’t create true translucency effects similar to SubsurfaceScatteringDiffuseMethod, it does create an organic softness when viewing the surface head-on, an effect that is as subtle as it is effective.

Lighting Set-up

The light set-up is very traditional, a directional light coming from above and the front (by default) with a bright blue point light to the right and a red point light to the left. It’s worth noting however that I’ve set the directional light’s specular property to a much lower value to prevent it from creating strong highlights. Much like a softbox, I’d imagine.

Enjoy tweaking!

Leave a comment (7 comments)

Away3D 4.1 (dev) Dynamic Reflections

Tags: , , , , , , , ,

R2D2*2One of the features we considered important for the next release of the Away3D engine (4.1) were real-time dynamic reflections, allowing for more realism and precision than the common static environment maps. In the dev branch of the engine, you can now find two flavours: reflections based on dynamic environment maps, and planar reflections.

Dynamic Environment Maps

This technique simply uses cube maps that are rendered to on the fly. Usually, they’re used for any non-planar surfaces, and while they can look convincing enough for complex models they do suffer the same flaws as normal environment maps. Since the scene is rendered for each face of the cube from a single point, the calculated reflections would obviously only be correct for that single point in space, but using it for relatively small and complex objects can look convincing enough. However, since it renders the scene 6 times, it can be slow for more complex situations.

The necessary functionality is exposed through CubeReflectionTexture, a class that can be used wherever a CubeTextureBase is expected: EnvMapMethod and variations, or even as a Skybox texture. I have yet to come up with a use for the latter case, though ;)  To get the best results, it’s usually a good idea to set the CubeReflectionTexture’s position to the centre of your reflective object. The cube map will be generated from this point and on average will yield the best results for all other points.

Check out the demo.
Source in the “dev” examples repository

Planar Reflections

For planar surfaces, a much cheaper approach and one that is very precise can be used. This means normal flat mirrors, polished floors, water, … which are quite common in games can be rendered much more effectively. Since the rules for reflection for the entire surface are the same, we can simply render the scene from a mirrored camera perspective. The only thing we need to make sure is that objects (or parts of objects) behind the mirror aren’t being rendered in this way. Usually, in OpenGL or DirectX, you’d simply introduce a new user-defined clip plane. Flash, however, doesn’t support anything of the sort. Instead, the projection matrix needs to be adapted so that the near plane becomes oblique; aligned with the mirrored plane, effectively clipping any straddling geometry along the mirror. Unfortunately, this also wreaks havoc on the far plane, which will starting cutting geometry that is in the mirrored view due to being at a different angle. Eric Lengyel effectively describes the issue and how he cleverly solves it in his Oblique View Frustum paper. (And while I’m at it, his book is awesome too.)

The texture target is provided as PlanarReflectionTexture. Similar to the cube maps, they need some information about where their respective reflective surfaces are. In this case, it’s the plane property; referencing a Plane3D object. Furthermore, it has a “scale” property that lets you define how much the texture should be scaled down to control quality vs rendering speed. Due to the different math and texture types involved, PlanarReflectionTexture can only be used with specific material methods. Currently, these are PlanarReflectionMethod and FresnelPlanarReflectionMethod. Except for internals and texture type, these function pretty much identical to their EnvMap counterparts.

Check out the demo
Source in the “dev” examples repository.

In closing, this is of course only in the dev branch, which means it’s still subject to change!

Leave a comment (13 comments)

Speaking at Reasons to be Creative 2012!

Tags: , , , , , , , , , , , ,

Oh boy, it shames me to see my last post has already been from December last year! Not that I haven’t been keeping busy; some binned personal projects, some that aren’t quite “there” yet, and a 3-month stint near San Francisco (what a city!). So yes, I’m happy to have a reason for another update, and what a Reasons it is!

After presenting at the awesome Flash on the Beach last year, I have the unexpected honour of having been asked to come back for another round this year with the conference being restyled as Reasons to be Creative. Sweet! My session this year is called “A Trick of Light”, and will primarily deal with 3D shading: simulating lighting for 3D rendering. I touched upon this subject briefly last year, but I felt such an interesting subject deserves full-time attention. I’m working hard on explaining things in an intuitive way, something many books forget to do, while still providing some maths. Just a little and in a very unrigorous way, so don’t be afraid if you’re a mathophobe ;) I won’t be digging into any actual code as I find that relatively pointless compared to understanding the actual concepts. Furthermore, I wish to present these in as much a platform-independent way as possible. However, all my examples will obviously be built using Away3D and I’ll be plugging that now and then, or what did you expect ;)

The line-up is looking great again this year and I’m glad to see many friends represented in the speaker list! Check out  the likes of Rob “I like turtles” Bateman, Frank “wob-wob” ReitbergerEugene “buy-me-a-beer” ZatepyakinJoa “who needs semi-colons anyway” Ebert, Jon HowardAndre Michelle, Mario Klingemannet al… Do yourself a favour and don’t miss it! I myself am looking forward to hanging out with old and new friends and get some inspiration shots, so do come over and have some beers with us!

Well, it’s time for me to lock myself up inside again with some 80s thrash metal and get that presentation done! See you all in September!


Leave a comment (0 comments)

The Away3D “dev” Branch

Tags: , , , ,

If you’ve been following the updates on the Away3D blog, you’ll have noticed the updated roadmap mentioning the dev branch on Github. This branch is basically where we’re working to get things towards Beta, so take a look if you’re curious to see where we’re headed. I personally advise anyone to use this branch if you’re starting out with a new project but make a snapshot of the revision you’re working with. Some things will still change and might very well break your code ;)

We’ll put up some proper blog posts introducing new features as we get to Beta, but for now I’ll quickly explain what I’ve personally been working on, and how I broke your existing code ;) I’ve also went ahead and updated the source code for the demos in previous blog posts to match the dev branch, so you can see how it differs concretely.


Death to BitmapMaterial! All hail TextureMaterial!

One of the biggest changes, I think. Favouring composition over inheritance, we deprecated BitmapMaterial, VideoMaterial, MovieMaterial etc. They have been replaced by a single TextureMaterial, which accepts a Texture2DBase object. In practice, this will for instance be a BitmapTexture (VideoTexture etc are still in development). This way, when supporting new texture types you don’t need to extend every type of material that needs to extend this material type, which is especially a mess when you start creating custom materials (and need to extend/duplicate those to support all possible texture types). The same applies for cube maps (fe: BitmapCubeTexture), the normal and specular maps that are set on the default materials, and the view’s backgroundImage (now simply View3D::background). It’s a big change that might annoy many of you, but it’s necessary. With things like ATF support coming up (and who knows what else), things would simply become unmanageable and error-prone otherwise.

Furthermore, there are some “special” convenience textures that can be used for the default materials. For instance, these materials expect a specular map to have the specular strength on the red channel, and the specular power (gloss) on the green. SpecularBitmapTexture allows you to pass two greyscale BitmapData objects (gloss is optional) and composites the data correctly. When using texture splatting, you can use SplatBlendBitmapTexture, which takes 3 BitmapData objects containing the blending value for each splatting layer and places each on the red, blue and green channels as expected by TerrainDiffuseMethod. However, in both cases, it’s usually better to do these things in your offline asset preparation stage and use simpler texture objects instead.


Light Picking

Another rather big change for those working with lights, but one that offers great benefits. Instead of assigning the lights as a static array as before, materials now expect a LightPickerBase object. Right now, that means StaticLightPicker, which in turn accepts the array of lights. Why this extra object? This way, you can create a DynamicLightPicker object that selects the most important lights from the EntityCollector, allowing different lights to be used without reassigning the light array (and as a result potentially invalidating the material). As light collection is often game-engine dependent, providing our own dynamic light picker is not the highest priority. At least it’s good to know the possibility is there, right? ;)


Disposal

Before, most dispose(…) methods accepted a “deep” parameter, which caused “sub-assets” (Geometry of a Mesh, BitmapData of a BitmapTexture, etc) to be disposed as well. While in some cases this saves you from writing a trivial few lines of disposal code, in many cases it just is an open door to invalid state (accidentally disposing a BitmapData used by another BitmapTexture) and ambiguity (what will be cleared, and what will remain uncleaned?). Allowing an object to destroy objects it did not create is poor resource management and generally bad practice in my opinion. Hence the new credo: you clean up what you create!


Ambient lighting

There have been some changes in how ambient lighting works. Before, the ambient and ambientColor of the materials dictated how much ambient light is coming from the lights, rather than how much ambient light is actually reflected by the material. That has been changed, and lights now have ambient and ambientColor properties as well. As a result, ambient light now functions similar to diffuse and specular light. The lights emit it, the material reflects it. It’s usually best to only set ambient light properties on DirectionalLight objects, since ambient light is global. PointLight objects can get culled if they’re not affecting anything in the frustum and their ambient contribution would be dropped as a result.


Other changes and new features

  • Big refactor on how the materials and animations are compiled to facilitate building custom materials
  • Slight restructuring of the render flow to allow more intricate custom renderers
  • Light probes (default materials only support convoluted cube maps at this point)
  • Reduced shadow swimming with shadow mapping
  • RefractionEnvMapMethod for environment-map based refraction mapping
  • AnisotropicSpecularMethod for anisotropic specular highlights
  • Shadow mapping for point lights (HardShadowMapMethod only)
  • AlphaMaskMethod to influence the material’s alpha, optionally based on a secondary UV set
  • Light map methods: DiffuseLightMapMethod to apply light maps as diffuse light, and LightMapMethod to apply it on the final shaded result
  • WrapDiffuseMethod to perform a very cheap fake way for subsurface scattering, as outlined in GPU Gems #1
I hope to scrape together some time to write some things about these new features as soon as possible. A recurring promise, I know, but bear with me here ;)
Update: Forgot to mention that there are also updated official Away3D demos in the examples’ texture-refactor branch (the name is due to a previous branch).
Leave a comment (6 comments)

Away3D 4.0 Demo for Flash on the Beach 2011

Tags: , , , , , , , ,

Oh such busy times! I’m not keeping up with my planned blog posts as much as I’d like, but between work and Away3D 4.0 updates there’s not as much time left to actually write about it. But, I did want to share a video from my presentation on Flash on the Beach 2011, showcasing some of the things that can be done relatively easily with Away3D 4.0 by compositing several shadow methods and so on. It also showcases some tricks that aren’t in the engine yet, but will be after some refactoring. It’s very much a coder’s demo, so don’t expect too much artistic sense ;)

Some of the things shown that I’d like the point out:

  • Subsurface scattering for ice and gelatinous materials
  • Large amount of independently moving scene graph objects (1000 cubes)
  • Terrain texture splatting
  • Partial shadow mapping for large view frustra (coming soon)
  • Dynamic cube map refraction + colour aberration (coming soon)
  • Dynamic cube map reflections (coming soon)

I’ll elaborate on some more once they’re available in the engine, I promise! :)

The Away3D team also recently joined forces with Evoflash (in particular Simo) again to create a real scene demo for Adobe MAX. Read all about that one Simo’s blog. Great job guys!

Leave a comment (11 comments)

© 2009 Der Schmale – David Lenaerts’s blog. All Rights Reserved.

This blog is powered by Wordpress and Magatheme by Bryan Helmig.