Der Schmale – David Lenaerts’s blog

Flash Platform Experiments

3D smoke: taking Pixel Bender to the next dimension

Tags: , , , , , , ,

smoke3d
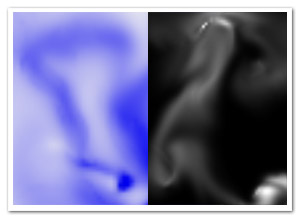
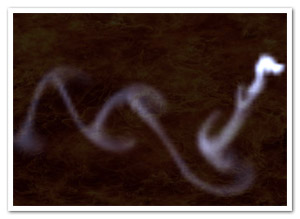
One final thing I wanted to achieve with smoke effects is to port the 2D simulation to 3D. Early results in pure AS3 were pretty disappointing, so again I turned to Pixel Bender and its speedy goodness. Still, the main obstacle was of course performance. The first step was to optimize the original 2D version by doing more in a single filter, throwing out some repetitive calculations performed per pixel, etc. And obviously, adding an extra dimension means more calculations. This system is grid-based, so the amount of nodes increases a lot! As a result, the grid size is reduced to 18×32x12 , which is leaning dangerously close to the realm of visual crud. Still, as an experiment, I consider it acceptable, and it’s using some tricks that might be worth sharing. Perhaps someone can do something better with this :)

I’ll explain a bit on how it works since I usually forget that part (if you’re not interested, just scroll down a bit). The actual fluid solver is based on the work of Jos Stam, and a lot has been written on the subject already.

3D textures

Pixel Shaders for 3D graphics such as GLSL have support for 3D textures. Since Pixel Bender is made for 2D, we have to find a different way to map a 3D grid to work with Pixel Bender. The solution is so straightforward that it’s hardly worth mentioning, but since I haven’t seen it done before, I will explain it anyway. All slices of the texture/grid along the z-axis are simply placed next to eachother, as pictured below:

smokeslices
Analogous to the representation of a 2D texture in a 1D array, the 2D coordinates are simply found by coord2D(x,y,z) = (x+gridWidth*z, y), or in a 1D array as coord1D(x, y, z) = (x+y*gridWidth*gridDepth+z*gridWidth). Told you it’s pretty pointless :)

Rendering

My first thought was to consider the grid as a set of voxels and use a raymarching algorithm to render it, although I knew that would end up being way too slow. Luckily, I found a much simpler solution that worked well enough. Depending on the world axis that is closest to the view vector, the grid is sliced up in bitmaps aligned to the grid’s local axes. Looking at the “box” head on, it’s simply divided in planes (parallel to the local XY plane) from back to front, when looking more from the left, it’s divided from left to right (parallel to the local YZ plane) and so forth. Using these slices, they’re simply placed on the stage as Bitmap objects using FP10’s 3D functionality. Luckily, the lack of depth sorting does not seem like such an important issue to create the illusion of a volume filled with smoke.

Finally

I’ll close up with some good news: I think I’m done with smoke for now! It’s not a promise, though… Moving on:

  • The demo – The box is invisible at first, in the middle of the screen. Fill it up with smoke and it’ll become visible.
  • The source – To get performance up a bit, there’s some guerilla-style coding. Enter at own risk!

Thanks to Joa for running his AS3V-tool on it – I can’t wait for it to go public! I don’t think I caught all violations, tho ;)

Leave a comment (12 comments)

Image bleeding with water (Flash + PixelBender)

Tags: , , , , , , ,

Image BleedingThe last 2 months, I’ve been investing 99% of my free time into the next iteration of Farbe, turning it into a real Flex-based image editing tool simulating natural media. Although there’s nothing of the application itself that I can show yet, today I created another small proof of concept for it that I can make public.

One of the things lacking in the watercolour POC was that once a brush stroke was made, nothing could be done with it. I thought it’d be nice to still be able to add water once the paint was rendered and have the colours bleed out. Using much of the same physics as for the watercolours, I figured out an algorithm that was both adequate in speed (real-time) as visually effective enough to water down the image. As usual, much Pixel Bender was used. The multi-threaded nature of ShaderJob really proved its worth in this case. You can keep adding water without the simulation slowing down the interaction, even if the simulation itself gets slow when there’s a lot of wet areas to cover.

To get the most realistic results, settings such as “ink speed” and “water amount” should be kept low while slowly rubbing over the image. Higher levels are not natural and will look caricatural (reminding me of Kai’s Power Tools of old! ;) ).

So check it out! :)

Note that, even tho Farbe is not an open source project (or not yet at least), I’m providing the source for this POC – consider it a late Easter present ;) But do remember, it IS poc-style code!

In closing, I’ll leave you with a few updates on Farbe. First of all, the watercolour paint is quite a bit faster (unless, of course, you’re working on much bigger canvas sizes than the cheaply upscaled old version) and so far it seems it’s pretty bug free! Secondly, I recently finished a pencil and eraser tool which are looking alright. The rest of the time has been spent mainly on the user interface and typical paint tool functionality. I’m starting to feel quite overworked at the moment, but the app is shaping up so it’s worth it! I hope I’ll be able to give out some more tangible updates on all that soon :)

Leave a comment (8 comments)

Experimenting with Alchemy: of Smoke, Milk, and Ink

Tags: , , , , , ,

Smoke and Milk simulationThanks to Ralph Hauwert’s blogpost pushing a baffling >300.000 particles using Alchemy, I finally got the much needed motivation to try out Alchemy myself. To be able to get started asap, I decided to return to something I’ve done before: fluid and smoke dynamics, but with a different algorithm (see Mike West’s article on Gamedev). It took me a while to figure it out, but it’s up an running! It’s a faster algorithm, but less physically correct.

While I typically would do most of these kinds of calculations in Pixel Bender, for the examples below, I decided to try it all in C and see how far Alchemy can be pushed. The grid is bigger than before, while the framerate is steady around 20 on my machine. Ralph has suggested some improvements for the rendering step already (thx! ;) ), so I’ll have some more experimenting to do :D

It was great to return to C, especially since it’s been 8 years since I’ve written my last line in that language. Quite a rush of nostalgia!

Source is included with the demos, tho it’s not the most reusable I’ve ever written :)

The HiRes FPS counter is done by Mr. Doob.

Leave a comment (18 comments)

Flash watercolour simulation (using PixelBender)

Tags: , , , , , , , , , ,

farbe-watercolour

Something I’ve been thinking about doing for a long time is imitating real artistic media, in particular watercolours. Not because I’m an avid watercolour painter (last time I’ve touched them was in kindergarten), but because I think it’s an interesting dynamic. Since it is mainly fluid dynamics, the idea resurfaced after my previous fluid sims. And luckily, with Pixel Bender, I can finally do this kind of thing! This paper by Cassidy J. Curtis et al was great, tho it also caused me to loose some time figuring out some errors. Finally I came up with something, dubbed Farbe (simply German for ‘colour’). One thing I dropped was the interaction between different strokes, because that would kill the cpu easily enough.

For a change, there’s no source of this, and for a few reasons. First of all, it’s a mess and needs to be optimized. Apart from that, I might just add on to this before I release anything (hence the project name ‘Farbe’).

The picture on the left is my poor imitation of Joan Miró’s Barcelona ‘92 poster (Strepie, this one’s for you ;) ), so ignore that and create your own :)

See Farbe in action

Leave a comment (21 comments)

Smoke/fluids simulation using Pixel Bender – part III

Tags: , , , , , , , ,

smoke-v3The third pass at smoke/fluids simulation again looks quite different from the previous two attempts, but this time it’s stable both when keeping still as while moving. Not surprisingly, as the current approach is more like Stam’s fluid solver. The downside is that it’s much less processor-friendly: every new step (adding forces, diffusion, advection, updating boundaries, …) needs the previous step to be completed over the entire velocity or pressure field. As a result, this simulation is using 9 different Pixel Bender kernels. In total, 49 pixel bender filters are executed per frame, some more intense as others, along with some BitmapData methods. Consequently, the grid size needs to be scaled down a lot  (64×128 in the example). All in all, I’m still surprised that it doesn’t slow down to a crawl!

The FluidBitmap class has some properties such as timeStep, buoyancy and viscosity, which can influence the look and tempo of the fluid, but can affect the stability of the solver due to precision errors using BitmapData. There is support for forces, encoded in a BitmapData, similar to the velocity field (red = x, green = y). Maybe some day, I’ll make working with these forces a bit easier, but for now I’ll focus on other things than fluids ;)  

The demo – A smoke simulation using positive buoyancy. Click to show the red and green channels representing the velocity field.

The source

Oh, and a happy new year! :)

Leave a comment (18 comments)

© 2009 Der Schmale – David Lenaerts’s blog. All Rights Reserved.

This blog is powered by Wordpress and Magatheme by Bryan Helmig.