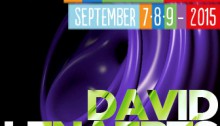
Der Schmale – David Lenaerts’s blog

Flash Platform Experiments

More Fresnel fun in Away3D: through the looking glass

Tags: , , , , , , , , , ,

glassBallAs a continuation of an earlier post, here’s a variation of the Fresnel Pixel Bender material. Still obviously inspired by Bartek’s Unity3D shader, it became a glass material with support for chromatic aberration (what causes the rainbow effect in refracted light). The result could come in handy in some situations, so I thought I’d share and commit it to the Away3D trunk as the GlassMaterial.

The material uses the same environment map to do (fake) refractions and reflections, so it’s not actually refracting the real scene around it. However, if you make a sphere map rendering of your scene, the effect can be convincing enough.

The demo shows a couple of default primitives and several settings of the material (such as glass colour and reflection strength), and also uses a new primitive called TorusKnot (which is a (p,q) torus knot). Consider that a tribute to a demo shown by Ralph during his presentation at FITC Amsterdam ;) . Click to cycle through the different settings, and check the source to see how it all works.

Update: As Makc pointed out in the comments (and rightly so), the refraction looked rather icky, so I updated it that it uses linear sampling. It’s a bit slower but looks much better.

Leave a comment (3 comments)

Fresnel reflective shading with Away3D

Tags: , , , , , , , , ,

fresnel-awayFinally, something new! But no, it’s not any of the bigger things I’ve been hinting at before. However, I’ve been hard at work at those (and other) projects for months, and ended up with tunnel vision and an annoying rut. I really needed to do something smaller again for some immediate visual fun. When Bartek showed me something on Twitter, I decided to take a step back from all the work, dig up some half-year old code and finish it asap. And so I did: that is a Fresnel Pixel Bender shader for Away3D, presented in the FresnelPBMaterial!

I’ve explained it before, but I’ll give a more general explanation this time around. Fresnel shading mimics the way light reflects off of (often translucent) surfaces such as water or glass. Looking head-on, you can see its proper surface (or see through it with refraction). However, if seen from a shallow angle, it reflects light (just imagine looking over a large body of water, or the mirage effect on the road on hot summer days).

Demos

I’ve thrown together some rather random demos to illustrate the point. There’s source for both. (A word of warning: apparently, on some FP10.1 betas, Pixel Bender causes it to throw an invalid input exception, which seems to be bogus.)

  • Glass and marble head: Yes, the head appears to be floating in the middle of a cathedral of some blurry sort. Click to cycle through different property settings: glass, alien marble (I’m sure that’s a thing), and plain marble.
  • Water surface: Using an animated normal map to illustrate how water could be rendered while using the fake refraction. It also shows the WaterMap util.

Another word of warning: slight implementation details might change in the next few days/weeks, but it should be nothing too dramatic!

I’ll probably be doing something more with this when I have the time, but nothing that would likely make it to the repository :-)

Leave a comment (8 comments)

All new normal map shaders in Away3D with Pixel Bender!

Tags: , , , , , , , , , , , , , ,

pixelshadingIt’s no secret that I like graphics. It’s the main reason why I play video games and it’s the main reason I got into programming. So obviously I was delighted to be invited and to join to the Away3D team last month. Inspired by my earlier Stok3d project (now on the backburner for a bit), I set off to create similar normal mapped pixel shaders, this time in full 3D. After some rough first patches (Stok3d was pretty simple since it only used DisplayObjects, flat planes), things have luckily shaped up, leading up to the first release!

The current state is a dot-release (3.4.2), so the exact implementation might still change while we’re working towards a shiny new 3.5.

The new shaders

So what is the difference with the previous shaders? Using Pixel Bender, the shading is calculated for every pixel in the texture, resulting in much more detailed and realistic lighting or reflections. Each shader requires an object-space normal map, which you can use to add detailed shading information without increasing the polycount of the mesh.

headshader

The shaders come in three flavors: environment map shaders, and single- and multi-pass shaders. Single-pass shaders take one PointLight3D and any AmbientLight3D on the scene to calculate the lighting, whereas multi-pass takes any number of lights of any type (AmbientLight3D, DirectionalLight3D, and AmbientLight3D). Important to note, tho, is that every light adds another pass and will be slower. Of course, if you’re only using 1 light, always use single pass.

Check out the following classes in Google Code:

  • DiffusePBMaterial: Single-pass, adds diffuse lighting to the texture
  • PhongPBMaterial: Single-pass, adds diffuse lighting and specular highlights, with support for specular maps
  • SpecularPBMaterial: Single-pass, adds only highlights – can be used in combination with Prefab3D’s prebaked lighting to create view-dependent specular highlights
  • DiffuseMultiPassMaterial: Diffuse shading with multiple light sources
  • PhongMultiPassMaterial: Phong shading with multiple light sources

Demosplaneshader

Enough explanations, time for some demos! Right-click to view source:

That’s it, enjoy! Feel free to drop by the mailing list for questions or read the official announcement! For now, I need to get some sleep before Flash on the Beach kicks off :)

Leave a comment (10 comments)

Flash watercolour simulation (using PixelBender)

Tags: , , , , , , , , , ,

farbe-watercolour

Something I’ve been thinking about doing for a long time is imitating real artistic media, in particular watercolours. Not because I’m an avid watercolour painter (last time I’ve touched them was in kindergarten), but because I think it’s an interesting dynamic. Since it is mainly fluid dynamics, the idea resurfaced after my previous fluid sims. And luckily, with Pixel Bender, I can finally do this kind of thing! This paper by Cassidy J. Curtis et al was great, tho it also caused me to loose some time figuring out some errors. Finally I came up with something, dubbed Farbe (simply German for ‘colour’). One thing I dropped was the interaction between different strokes, because that would kill the cpu easily enough.

For a change, there’s no source of this, and for a few reasons. First of all, it’s a mess and needs to be optimized. Apart from that, I might just add on to this before I release anything (hence the project name ‘Farbe’).

The picture on the left is my poor imitation of Joan Miró’s Barcelona ‘92 poster (Strepie, this one’s for you ;) ), so ignore that and create your own :)

See Farbe in action

Leave a comment (24 comments)

HDR Lighting in FP10 (+ Away3D)

Tags: , , , , , , ,

hdrIf you’ve played any video games the past few years, you’ve definately seen the HDR (High Dynamic Range) effect. Creating a more brilliant colour spectrum, it’s both popular in photography and 3D rendering. In games it typically enhances the brighter areas and makes light spill over into darker areas (the so called light blooming effect). Using some settings, it can also create a more blurry atmospheric surrounding. Being a big game fan (or rather gfx-fetishist), it’s an effect I’ve always wanted to do. Using a tiny Pixel Bender kernel and some Flash filters, I came up with this.

A demo showing the effect and its parameters on a simple image can be seen here: Demo | Source .

But let’s face it, when doing HDR, we want it in 3D ;)  Rob Bateman kindly gave me permission to use his shader demo for Away3D (a 3D engine I’m growing more and more fond of). This demo in particular suited the use of HDR perfectly, so many thanks! I just added the HDRContainer class to the stage, setting the View3D as the target, and voila!

See HDR in Away3D (compare with the original to see the difference)

No source for that one tho, as 1) it’s not my demo (apart from 2 extra lines of code), and 2) it’s pretty much the same as the first demo :)

It should be similar to use the effect on any DisplayObject, for that matter: pass it through to the HDRContainer’s constructor and add the HDRContainer to the stage.

Leave a comment (21 comments)

Smoke/fluids simulation using Pixel Bender – part III

Tags: , , , , , , , ,

smoke-v3The third pass at smoke/fluids simulation again looks quite different from the previous two attempts, but this time it’s stable both when keeping still as while moving. Not surprisingly, as the current approach is more like Stam’s fluid solver. The downside is that it’s much less processor-friendly: every new step (adding forces, diffusion, advection, updating boundaries, …) needs the previous step to be completed over the entire velocity or pressure field. As a result, this simulation is using 9 different Pixel Bender kernels. In total, 49 pixel bender filters are executed per frame, some more intense as others, along with some BitmapData methods. Consequently, the grid size needs to be scaled down a lot  (64×128 in the example). All in all, I’m still surprised that it doesn’t slow down to a crawl!

The FluidBitmap class has some properties such as timeStep, buoyancy and viscosity, which can influence the look and tempo of the fluid, but can affect the stability of the solver due to precision errors using BitmapData. There is support for forces, encoded in a BitmapData, similar to the velocity field (red = x, green = y). Maybe some day, I’ll make working with these forces a bit easier, but for now I’ll focus on other things than fluids ;)  

The demo – A smoke simulation using positive buoyancy. Click to show the red and green channels representing the velocity field.

The source

Oh, and a happy new year! :)

Leave a comment (18 comments)

Parallax Mapping with Pixel Bender (still burning cpu’s)

Tags: , , ,

Aw man, Mr. Doob went ahead and made me all stoked about Pixel Bender again (and there goes my patience, curse your leet hide!). I went back to the parallax mapping effect from my last post to see if I could make it work more correctly in Pixel Bender (using the steep parallax algorithm). And since we’re using Flash Player 10 anyway, I made the surface rotate in 3D to illustrate the effect a bit better. Because of the lack of loops when using PB in FP10, it’s limited and some things could look a bit weird (especially since I’m exaggerating the effect here). Pixel Bender in Flash also has its speed limits, so this is still a cpu killer… As a result, I had to throw out the part handling lighting and self-shadowing :(


Enough rambling, here’s the demo (Flash Player 10 needed!):

  • demo for FP10 browser plugin
  • swf for the standalone player
  • the source (including pixel bender code)
Leave a comment (4 comments)

(fake) 2D parallax mapping… will burn your cpu

Tags: , , , , ,

When Alternativa3D showed some demos with their parallax mapping, I always thought it’d be interesting to try it myself without having to resort to PixelBender.

Well, I did, and I wasn’t happy how some things turned out. There was no overlap of objects, and sharp edges would come out looking odd or distorted. Then, taking another look at their demo, I noticed they conveniently used slanted or smooth edges all the time without any possible overlap.

Reading up on some stuff, I decided to make the process iteratable, and liked it much better already. There are some downsides… Most importantly, it’s a cpu-killer and still pretty flawed compared to the real thing (which is a pixel shader). Nonetheless, it was fun to figure out and code, and that’s pretty much the reason why I decided to post it ;)

Oh, and I also rewrote the Bump Map from some time ago, since I needed it to make this demo a bit cooler overall. The code back then was a quick experiment; not exactly a beauty nor reusable whatsoever, which has been taken care of to some extent. Additionally, the lightmaps now support colours and you could just as well write your own.

Check out the demo here and the source here. The images used came from here.

Leave a comment (16 comments)

2D Bump+specular mapping

Tags: , ,

Bump mapping in AS3 has been done a couple of times before already, but I thought it would be cool to try out the effect with a seperate bump map for diffuse and specular lighting (with only slightly different logic for each ‘layer’, and that is how the light maps are calculated). It’s great to create wet surfaces or waterdrop effects.

Well, there’s not much more to say about it, it’s a rather old topic anyway ;) Enjoy the demo, and the source can be viewed by right-clicking, or here.

EDIT: I adapted the code a bit to fix the white pixels appearing :)

Leave a comment (20 comments)

© 2009 Der Schmale – David Lenaerts’s blog. All Rights Reserved.

This blog is powered by Wordpress and Magatheme by Bryan Helmig.