Der Schmale – David Lenaerts’s blog

Flash Platform Experiments

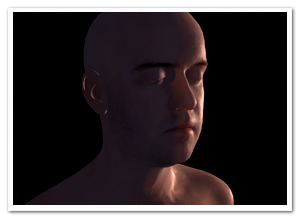
Subsurface Scattering and Advanced Skin Rendering in Away3D 4.0 (“Broomstick”)

Tags: , , , , , , , , , ,

skinRenderingMolehill, Adobe’s new API to leverage the GPU for rendering, was made public some time ago in the form of an “incubator” Flash Player release, and along with it we released an early pre-alpha version of Away3D 4.0, codenamed “Broomstick”. I’ve been working on the new engine for quite some time now, and since the release I hadn’t had the time to post any more information aside from what was shown on the blog post. Time to change that, I’d say!
Before you do anything else, you’ll need to install the Incubator Flash Player, because the demos will be using that. Secondly, there’s no guarantee that anything related to Away3D 4.0 will be exactly the same in the final release, as it is of course an early alpha. Finally, source for all demos is in the usual Away3D repository. They’re a bit messy, since they were actually just quick test files to see if everything still works ;)

Subsurface scattering

Subsurface scattering is basically what happens to light when it travels through a translucent surface. Instead of either simply reflecting off a surface or passing through it, the light will enter the material, reflect a good couple of times before exiting the surface again and reaching the eye. This behaviour causes a general blurring of the diffuse lighting on an object and allows light to shimmer through less “thick” regions. Just think about how a candle’s flame shines through the wax.

There’s a few rendering techniques that perform subsurface scattering to some extent. A popular approach is to render the diffuse lighting to a texture and simply blur it subsurfaceDepthMapslightly. However, I find that this approach doesn’t allow light to travel through an object and so I opted for another approach: using depth maps. Similar to shadow mapping, a depth map is rendered from the point of view of the light, and when rendering, we compare depths of the rendered pixel to the value in the depth map. Instead of using this to determine whether a pixel is in shadow or not, we can use the difference between these values to determine the “thickness” of the object, or how far light has to travel through it to be able to reach the eye (see my amateurish schematic on the right :) ).

Depending on this distance, we can colour the pixel differently. We define a colour the light gets by traveling through the object (this depends on the actual material), and the final pixel’s colour ranges from this “scatter colour” to the material’s (texture) colour, depending on how thick it is.

This technique can be used to make materials look like wax, such as in this demo.

Advanced Skin Rendering

Skin is in fact a translucent object, so we can use subsurface scattering to increase the realism, as usual rendering techniques often create a harsh or clay-like effect. Instead, subsurface scattering softens the general shading and allows light to travel through more translucent regions such as the ears, softer parts of the nose, etc.
To further increase the realism, the specular highlights are modulated using a fresnel term. As with most objects in reality, the reflectivity of an object changes depending on the view angle, and with it the strength of the highlights. When observing skin head-on, there’s usually not a strong direct light reflection, but it can usually be perceived on shallow angles.
The result of both can be seen here.

In Away3D 4.0

First of all, to get started using Broomstick, check out this article by John Lindquist. He did a great job explaining how to get started!
Default materials in Away3D 4.0 are currently implemented using “methods”, which are properties of a material that define how the shaders work in a modular fashion. This way, there’s no need for a billion variation of Material classes for each combination. For subsurface scattering, we need to change the diffuseMethod property of a material and assign an instance of SubsurfaceScatteringDiffuseMethod. For the fresnel specular highlights, we assign an instance of FresnelSpecularMethod to the specularMethod property. It’s all in the source, so knowing this, you should be able to make sense of what’s going on in there :)

Demos

In case you skipped through the rest of the article, here’s a demo recap. Loading times may be long, as the models are pretty big :)

Wax Statue : Illustrating subsurface scattering to generate a material resembling wax.
Head rendering: Using subsurface scattering and a specular fresnel term to increase realism in skin rendering. Press any key to toggle the subsurface scattering, so you can see the difference. Note the light shining through the ears, for example.

Leave a comment (3 comments)

More Fresnel fun in Away3D: through the looking glass

Tags: , , , , , , , , , ,

glassBallAs a continuation of an earlier post, here’s a variation of the Fresnel Pixel Bender material. Still obviously inspired by Bartek‘s Unity3D shader, it became a glass material with support for chromatic aberration (what causes the rainbow effect in refracted light). The result could come in handy in some situations, so I thought I’d share and commit it to the Away3D trunk as the GlassMaterial.

The material uses the same environment map to do (fake) refractions and reflections, so it’s not actually refracting the real scene around it. However, if you make a sphere map rendering of your scene, the effect can be convincing enough.

The demo shows a couple of default primitives and several settings of the material (such as glass colour and reflection strength), and also uses a new primitive called TorusKnot (which is a (p,q) torus knot). Consider that a tribute to a demo shown by Ralph during his presentation at FITC Amsterdam ;) . Click to cycle through the different settings, and check the source to see how it all works.

Update: As Makc pointed out in the comments (and rightly so), the refraction looked rather icky, so I updated it that it uses linear sampling. It’s a bit slower but looks much better.

Leave a comment (6 comments)

Fresnel reflective shading with Away3D

Tags: , , , , , , , , ,

fresnel-awayFinally, something new! But no, it’s not any of the bigger things I’ve been hinting at before. However, I’ve been hard at work at those (and other) projects for months, and ended up with tunnel vision and an annoying rut. I really needed to do something smaller again for some immediate visual fun. When Bartek showed me something on Twitter, I decided to take a step back from all the work, dig up some half-year old code and finish it asap. And so I did: that is a Fresnel Pixel Bender shader for Away3D, presented in the FresnelPBMaterial!

I’ve explained it before, but I’ll give a more general explanation this time around. Fresnel shading mimics the way light reflects off of (often translucent) surfaces such as water or glass. Looking head-on, you can see its proper surface (or see through it with refraction). However, if seen from a shallow angle, it reflects light (just imagine looking over a large body of water, or the mirage effect on the road on hot summer days).

Demos

I’ve thrown together some rather random demos to illustrate the point. There’s source for both. (A word of warning: apparently, on some FP10.1 betas, Pixel Bender causes it to throw an invalid input exception, which seems to be bogus.)

  • Glass and marble head: Yes, the head appears to be floating in the middle of a cathedral of some blurry sort. Click to cycle through different property settings: glass, alien marble (I’m sure that’s a thing), and plain marble.
  • Water surface: Using an animated normal map to illustrate how water could be rendered while using the fake refraction. It also shows the WaterMap util.

Another word of warning: slight implementation details might change in the next few days/weeks, but it should be nothing too dramatic!

I’ll probably be doing something more with this when I have the time, but nothing that would likely make it to the repository :-)

Leave a comment (9 comments)

More Stok3d: Parallax mapping & Water shading

Tags: , , , , , , , , ,

waterToday’s update on Stok3d is perhaps not as useful as the previous post, but I certainly had fun working on it. Or as we say in Dutch with a word blatantly stolen from German: it’s “spielerei”.

Demos:

I’m going to post the demos first this time. Saves you some scrolling effort, because the explanations below are rather boring ;)

  • Parallax Mapping : Move and turn towards the edges of the screen to see the extrusion of the texture best. A PhongFilter is added as a second filter, making it slower but the effect becomes more obvious.
  • Water Shading 1 – Ocean : Reflects or refracts light depending on the view angle and the surface relief. It animates a perlin noise filter to generate a water heightmap.
  • Water Shading 2 – Ripples : Same thing, but with a simple drawn ripple effect. The difference between refracted and reflected light is more obvious here.

Edit: Even if you have Flash Player 10, you still might get an update request. That is because these demos require the version of 10.0.22 concerning recent Pixel Bender bugfixes.

The source code for these demos can also be found on Google Code.

Useful updates

Some updates I did involved some bugfixes and performance-related updates. I also added a NormalMapUtil class, which provides a basic API to generate and manipulate normal maps. The main features are the generateFromHeightmap and drawFromHeightmap methods. Since height maps (or bump maps) are generally easier to come by (and to make), these methods generate a normal map for you. generateFromHeightMap creates a new BitmapData, drawFromHeightMap uses an existing BitmapData that you provide (useful if you need to generate one on every frame). The NormalMapUtil class furthermore allows you to invert the components of the normals, in case a normal map reflects the light in the wrong directions.

Water Shading

A new shader filter that was added is the WaterShadingFilter. If you remember your high school physics, depending on the view angle, the surface either reflects the light or lets it pass through and refracts it (which is called the fresnel effect).  To put it simply, when looking at water at a shallow angle, it seems like a very reflective surface, but when looking straight down into it, you can see through it but it’s a distorted view. The reflection uses a combination of environment mapping and phong shading, while the refraction is a simple displacement mapping technique. The DisplayObject to which the filter is applied is used as what’s underneath the surface, ie: the refracted light. The ripples seen in the demo are not made by the filter, but are custom written to manipulate the normal map.

Parallax Mapping

Another new filter is the ParallaxFilter, which performs (you guessed it) parallax mapping. It’s a technique like bump and normal mapping, in the sense that it tries to give more depth to a 2D texture. It does so by displacing texture coordinates based on a height map and view direction to the coordinate that it would normally have in 3D space. This causes the texture to look extruded and more detailed. For more (and better) information, check the article on wikipedia. Stok3d implements an iterative variation. It’s a bit slower but takes care of overlap issues and can handle sharp edges.

That’s it! For now, it’s back to Farbe, and… some other things :)

Leave a comment (15 comments)

© 2009 Der Schmale – David Lenaerts’s blog. All Rights Reserved.

This blog is powered by Wordpress and Magatheme by Bryan Helmig.